Maven搭建SSM(SpringMVC+Spring+MyBatis)框架入门教程(超级详细)
前面介绍了基于 Maven 使用 Struts+Spring+Hibernate(SSH)框架,模仿企业级应用的开发过程,实现了用户的 CRUD 功能。接下来再使用 SpringMVC+Spring+MyBatis(SSM)框架,同样模仿企业级应用的开发过程,实现用户的 CRUD 功能。
目的很明确,让用户能直接基于 SSH 和 SSM 两个流行框架进行项目开发,减少学习到使用之间的转换过程。
基于 SSM 框架,用户可以独立搭建 SpringMVC、Spring 和 MyBatis 三个基本的 POM 构件。其中,Spring 的 POM 在前面的样例中已经搭建好了,叫 SpringPOM 构件。本节主要介绍 SpringMVC 和 MyBatis 构件 POM。
另外,SpringMVC 封装的是 Web 层应用,底层使用的是 Jsp/Servlet 技术,所以在 SpringMVC POM 中需要加入 Jsp/Servlet 相关的依赖。
因为在用户 CRUD 样例中需要有 JSON 的响应,而且 JSON 的请求和响应在实际项目中也很普通,所以在 SpringMVC POM 中也添加了 JSON 的相关依赖。
pom.xml 的详细内容如下:
MyBatis4MySQLPOM 的 pom.xml 详细内容如下:
注意,因为 SpringPOM 是 pom 构件,所以在应用它的依赖的时候,需要指定 type 为 pom,详细情况查看 pom.xml。
pom.xml 内容如下:
MyBatisConfiguration.java,配置 MyBatis 的基本信息,包括数据库连接信息。
为了完成它,同时避免 MyBatisDAO 集成到系统项目中的改动,添加了一个供 MvnUserDAOImpl 测试的服务类。里面不加业务逻辑,直接调用 DAO 接口中的方法,只是在类上面添加了事务管理。所以测试代码主要有以下几个部分。
1)IMvnUserService.java,临时测试用的服务层接口。
因为前面 MyBatis DAO 的实现使用的是 MyBatis3 的新特征:接口和映射文件自动绑定,没有自己独立实现 DAO 类,更没有在 Spring 容器中配置 DAO Bean、指定 Bean 的名称。
MvnSSMDemo.Service.Impl 工程的实现步骤如下。
pom.xml 的代码如下所示:
UserServiceImpl.java,实现用户的 CRUD 功能。
所以要理解后面的代码实现需要有 SpringMVC 4.x 的开发基础,建议没有接触过的读者先参考 SpringMVC 4.0 注解开发 Web 应用的相关资料。
Web 层基于框架的开发流程可以抽象成以下几个部分。
基于 SpringMVC 4.x 用零配置方式开发 Web 层也是同样的流程。只是因为是零配置方式,也就看不到配置文件相关的代码,但是以前配置文件描述的信息肯定还是要描述的,只是用注解或其他方式体现。
对 SpringMVC Web 的实现思路有了基本了解后,接下来就开始实现 SSMDemo 的 Web 层功能。
单击 Maven 中的创建 Maven Project 的选项,如图 1 所示。
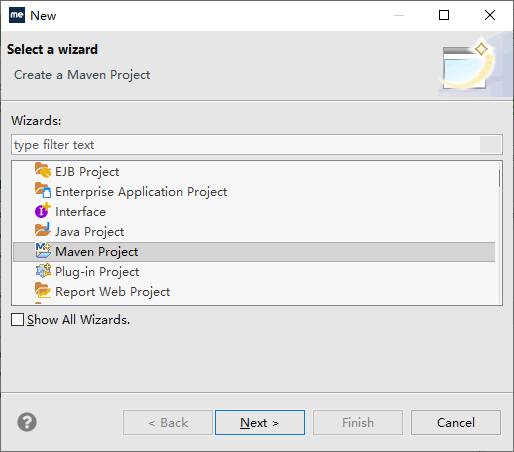
图 1 创建 Maven Project
单击 Next 按钮,进入 Archetype 的选择界面,选择 webapp-javaee6 插件,如图 2 所示。
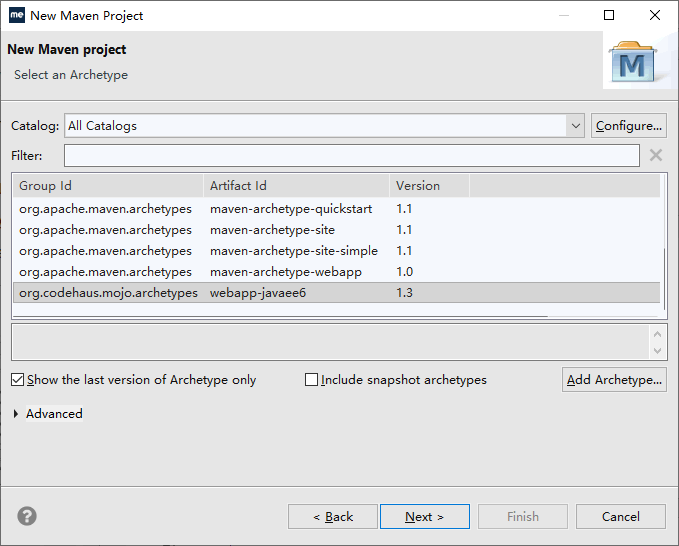
图 2 选择webapp-javaee6
单击 Next 按钮,进入类似如图 3 所示的界面,在界面中输入工程的 Group Id、Artifact Id、Package,选择一个 Version 版本。
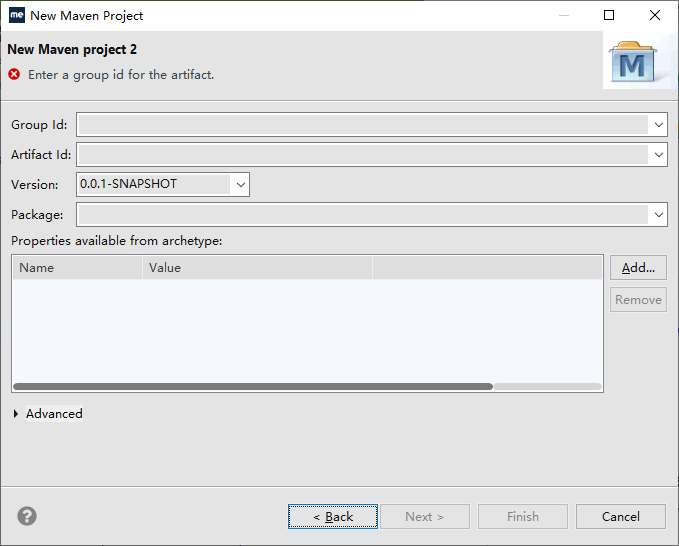
图 3 输入项目坐标
单击 Finish 按钮,创建 Web 工程,项目就创建好了。
所以 pom.xml 中主要体现在对 SpringPOM 父 pom 构件的继承和对后面四个构件的依赖。
另外,为了发布到 Web 服务器上运行,需要配置 cargo-maven2-plugin 插件。
pom.xml 详细内容如下:
1)SpringMVCIntializer.java。在 Web 容器中初始化 DispatcherServlet。Web 服务器启动时会自己调用初始化,代替以前在 web.xml 中配置 DispatcherServlet 的 servlet 和 servlet-mapping。
具体操作都是:右击“工程”,选择 Run As→Maven test→install→deploy 命令。
发布好后,在 Tomcat 的 webapps 发布目录下会有 MvnSSMDemo.war 文件,启动 Tomcat 就可以自动发布 Web 应用。
但是为了方便管理,有必要创建一个工程,将前面独立实现的各个模块管理起来。这样每次编译、测试、安装和发布的时候都能基于 Maven 实现自动同步。
整合 SSM 模块的具体步骤如下。
前面介绍的是基于编辑器直接编写 pom.xml,这里介绍基于 MyEclipse 的图形化界面,基于向导界面修改 pom.xml(添加模块)。
通过单击不同标签选择打开方式,如图 4 所示。

图 4 pom.xml
如果选择的是 pom.xml,显示的是 pom.xml 源文件,可以按以前的方式基于源代码修改 pom.xml。现在选择 Overview 标签,显示界面如图 5 所示。
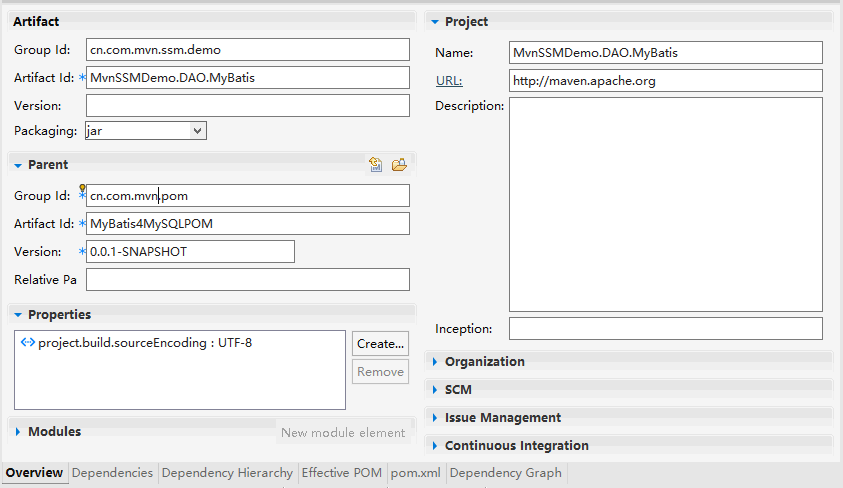
图 5 可视化pom.xml
单击 Modules 范围内的 Add… 按钮就可以通过图形界面选择需要添加的模块。保存后就完成了模块的集成。
目的很明确,让用户能直接基于 SSH 和 SSM 两个流行框架进行项目开发,减少学习到使用之间的转换过程。
创建公共 POM
为了使公司项目有正常的沉淀和重用,先创建基于 SSM 框架开发的公共 POM 构件,以免以后项目和开发人员的重复搭建。基于 SSM 框架,用户可以独立搭建 SpringMVC、Spring 和 MyBatis 三个基本的 POM 构件。其中,Spring 的 POM 在前面的样例中已经搭建好了,叫 SpringPOM 构件。本节主要介绍 SpringMVC 和 MyBatis 构件 POM。
1. SpringMVC POM
因为 SpringMVC 同 Spring 已经在 SpringPOM 配置好了,现在只需继承 SpringPOM。另外,SpringMVC 封装的是 Web 层应用,底层使用的是 Jsp/Servlet 技术,所以在 SpringMVC POM 中需要加入 Jsp/Servlet 相关的依赖。
因为在用户 CRUD 样例中需要有 JSON 的响应,而且 JSON 的请求和响应在实际项目中也很普通,所以在 SpringMVC POM 中也添加了 JSON 的相关依赖。
pom.xml 的详细内容如下:
<project xmlns="http://maven.apache.org/POM/4.0.0"
    xmlns:xsi="http://www.w3.org/2001/XMLSchema-instance"
    xsi:schemaLocation="http://maven.apache.org/POM/4.0.0 http://maven.apache.org/xsd/maven-4.0.0.xsd">
    <modelVersion>4.0.0</modelVersion>

    <groupId>cn.com.mvn.pom</groupId>
    <artifactId>SpringPOM</artifactId>
    <version>0.0.1-SNAPSHOT</version>
    <packaging>pom</packaging>

    <name>SpringPOM</name>
    <url>http://maven.apache.org</url>

    <properties>
        <project.build.sourceEncoding>UTF-8</project.build.sourceEncoding>
        <!-- 3.2.16.RELEASE,3.1.4.RELEASE -->
        <project.build.spring.version>4.2.7.RELEASE
        </project.build.spring.version>
    </properties>

    <dependencies>
        <dependency>
            <groupId>junit</groupId>
            <artifactId>junit</artifactId>
            <version>4.7</version>
            <scope>test</scope>
        </dependency>
        <!-- spring -->
        <dependency>
            <groupId>org.springframework</groupId>
            <artifactId>spring-core</artifactId>
            <version>${project.build.spring.version}</version>
        </dependency>

        <dependency>
            <groupId>org.springframework</groupId>
            <artifactId>spring-aop</artifactId>
            <version>${project.build.spring.version}</version>
        </dependency>
        <dependency>
            <groupId>org.springframework</groupId>
            <artifactId>spring-beans</artifactId>
            <version>${project.build.spring.version}</version>
        </dependency>
        <dependency>
            <groupId>org.springframework</groupId>
            <artifactId>spring-context</artifactId>
            <version>${project.build.spring.version}</version>
        </dependency>
        <dependency>
            <groupId>org.springframework</groupId>
            <artifactId>spring-context-support</artifactId>
            <version>${project.build.spring.version}</version>
        </dependency>
        <dependency>
            <groupId>org.springframework</groupId>
            <artifactId>spring-web</artifactId>
            <version>${project.build.spring.version}</version>
        </dependency>
        <dependency>
            <groupId>org.springframework</groupId>
            <artifactId>spring-webmvc</artifactId>
            <version>${project.build.spring.version}</version>
        </dependency>
        <!-- https://mvnrepository.com/artifact/org.springframework/spring-aspects -->
        <dependency>
            <groupId>org.springframework</groupId>
            <artifactId>spring-aspects</artifactId>
            <version>${project.build.spring.version}</version>
        </dependency>
        <dependency>
            <groupId>org.springframework</groupId>
            <artifactId>spring-orm</artifactId>
            <version>${project.build.spring.version}</version>
        </dependency>
        <dependency>
            <groupId>org.hibernate</groupId>
            <artifactId>hibernate-validator</artifactId>
            <version>5.0.0.Final</version>
        </dependency>
    </dependencies>
    <distributionManagement>
        <repository>
            <id>archivaServer</id>
            <url>http://localhost:8080/repository/internal</url>
        </repository>
        <snapshotRepository>
            <id>archivaServer</id>
            <url>http://localhost:8080/repository/snapshots</url>
        </snapshotRepository>
    </distributionManagement>
</project>
2. MyBatis POM
考虑到 MyBatis 最终要同 Spring 集成,并且是基于 MySQL 数据库。在 MyBatis 的 POM 中需要定义如下关键的依赖。- MyBatis 构件。
- MyBatis 同 Spring 集成的构件。
- 连接池构件。
- MySQL 数据库驱动构件。
MyBatis4MySQLPOM 的 pom.xml 详细内容如下:
<project xmlns="http://maven.apache.org/POM/4.0.0"
    xmlns:xsi="http://www.w3.org/2001/XMLSchema-instance"
    xsi:schemaLocation="http://maven.apache.org/POM/4.0.0 http://maven.apache.org/xsd/maven-4.0.0.xsd">
    <modelVersion>4.0.0</modelVersion>

    <groupId>cn.com.mvn.pom</groupId>
    <artifactId>MyBatis4MySQLPOM</artifactId>
    <version>0.0.1-SNAPSHOT</version>
    <packaging>pom</packaging>

    <name>MyBatis4MySQLPOM</name>
    <url>http://maven.apache.org</url>

    <properties>
        <project.build.sourceEncoding>UTF-8</project.build.sourceEncoding>
        <!-- 3.6.5.Final,3.3.2.GA -->
        <project.build.mybatis.version>3.4.0</project.build.mybatis.version>
    </properties>

    <dependencies>
        <!-- MyBatis -->
        <dependency>
            <groupId>org.mybatis</groupId>
            <artifactId>mybatis</artifactId>
            <version>${project.build.mybatis.version}</version>
        </dependency>
        <!-- MyBatis同Spring的集成构件 -->
        <dependency>
            <groupId>org.mybatis</groupId>
            <artifactId>mybatis-spring</artifactId>
            <version>1.3.0</version>
        </dependency>
        <dependency>
            <groupId>org.mybatis.generator</groupId>
            <artifactId>mybatis-generator-core</artifactId>
            <version>1.3.2</version>
        </dependency>
        <!-- Datasource连接池 -->
        <dependency>
            <groupId>commons-dbcp</groupId>
            <artifactId>commons-dbcp</artifactId>
            <version>1.4</version>
        </dependency>
        <!-- MySQL数据库驱动 -->
        <dependency>
            <groupId>mysql</groupId>
            <artifactId>mysql-connector-java</artifactId>
            <version>5.1.34</version>
        </dependency>
        <dependency>
            <groupId>junit</groupId>
            <artifactId>junit</artifactId>
            <version>4.7</version>
            <scope>test</scope>
        </dependency>
    </dependencies>
    <distributionManagement>
        <repository>
            <id>archivaServer</id>
            <url>http://localhost:8080/repository/internal</url>
        </repository>
        <snapshotRepository>
            <id>archivaServer</id>
            <url>http://localhost:8080/repository/snapshots</url>
        </snapshotRepository>
    </distributionManagement>
</project>
实现MyBatis DAO模块
因为它同 SSH 框架实现的用户 CRUD 功能一样,所以在 SSM 中,DAO 层的接口同 SSH 中的 DAO 层接口是一样的,这里就不再重新定义了,直接重用前面样例中创建的 MvnSSHDemo.DAO 构件。这里直接创建 MyBatis 的 DAO 实现部分工程,对 DAO 层接口基于 MyBatis 进行实现。1. 创建 MvnSSMDemo.DAO.MyBatis 工程
MvnSSMDemo.DAO.MyBatis 的工程中,只需创建 Maven 的普通 Java 工程就行。2. 编写 pom.xml
MvnSSMDemo.DAO.MyBatis 是基于 MyBatis 实现的,所以 pom 先继承 MyBatis4MySQLPOM,然后考虑到同 Spring 集成,并且实现的是 MvnSSHDemo.DAO 中定义的接口,所以需要添加 SpringPOM 和 MvnSSHDemo.DAO 的构件依赖。注意,因为 SpringPOM 是 pom 构件,所以在应用它的依赖的时候,需要指定 type 为 pom,详细情况查看 pom.xml。
pom.xml 内容如下:
<project xmlns="http://maven.apache.org/POM/4.0.0"
    xmlns:xsi="http://www.w3.org/2001/XMLSchema-instance"
    xsi:schemaLocation="http://maven.apache.org/POM/4.0.0 http://maven.apache.org/xsd/maven-4.0.0.xsd">
    <modelVersion>4.0.0</modelVersion>
    <parent>
        <groupId>cn.com.mvn.pom</groupId>
        <artifactId>MyBatis4MySQLPOM</artifactId>
        <version>0.0.1-SNAPSHOT</version>
    </parent>
    <groupId>cn.com.mvn.ssm.demo</groupId>
    <artifactId>MvnSSMDemo.DAO.MyBatis</artifactId>
    <packaging>jar</packaging>

    <name>MvnSSMDemo.DAO.MyBatis</name>
    <url>http://maven.apache.org</url>

    <properties>
        <project.build.sourceEncoding>UTF-8</project.build.sourceEncoding>
    </properties>

    <dependencies>
        <!--SpringPOM构件依赖 -->
        <dependency>
            <groupId>cn.com.mvn.pom</groupId>
            <artifactId>SpringPOM</artifactId>
            <version>0.0.1-SNAPSHOT</version>
            <type>pom</type>
        </dependency>
        <!--DAO接口依赖 -->
        <dependency>
            <groupId>cn.com.mvn.ssh.demo</groupId>
            <artifactId>MvnSSHDemo.DAO</artifactId>
            <version>0.0.1-SNAPSHOT</version>
        </dependency>
    </dependencies>
    <distributionManagement>
        <repository>
            <id>archivaServer</id>
            <url>http://localhost:8080/repository/internal</url>
        </repository>
        <snapshotRepository>
            <id>archivaServer</id>
            <url>http://localhost:8080/repository/snapshots</url>
        </snapshotRepository>
    </distributionManagement>
</project>
3. 编写实现代码
基于 MyBatis 实现的 DAO 持久层,需要写以下代码。MyBatisConfiguration.java,配置 MyBatis 的基本信息,包括数据库连接信息。
package cn.com.mvn.ssm.demo.dao.mybatis;

import java.io.IOException;
import java.util.Properties;

import javax.sql.DataSource;

import org.apache.commons.dbcp.BasicDataSource;
import org.apache.ibatis.io.Resources;
import org.mybatis.spring.SqlSessionFactoryBean;
import org.mybatis.spring.mapper.MapperScannerConfigurer;
import org.springframework.beans.factory.annotation.Autowire;
import org.springframework.context.annotation.Bean;
import org.springframework.context.annotation.ComponentScan;
import org.springframework.context.annotation.Configuration;
import org.springframework.core.io.Resource;
import org.springframework.core.io.support.PathMatchingResourcePatternResolver;
import org.springframework.core.io.support.ResourcePatternResolver;

@Configuration // 允许注解
@ComponentScan(basePackages = { "cn.com.mvn" }) // 注解类的基本包
public class MyBatisConfiguration {
    // 将方法结果按Bean管理,别的地方可以按类型进行装配
    @Bean(autowire = Autowire.BY_TYPE)
    public DataSource dataSource() {
        // 创建数据源
        BasicDataSource dataSource = new BasicDataSource();
        Properties prop = null;
        try {
            // 读资源文件中的数据库连接信息
            prop = Resources.getResourceAsProperties("db.properties");
            String driverClass = prop.getProperty("jdbc.driverClassName");
            String jdbcUrl = prop.getProperty("jdbc.url");
            String uname = prop.getProperty("jdbc.username");
            String password = prop.getProperty("jdbc.password");

            dataSource.setDriverClassName(driverClass);
            dataSource.setUrl(jdbcUrl);
            dataSource.setUsername(uname);
            dataSource.setPassword(password);
            dataSource.setRemoveAbandonedTimeout(60);
            dataSource.setRemoveAbandoned(true);
            dataSource.setLogAbandoned(false);
            dataSource.setMinIdle(10);
            dataSource.setMinEvictableIdleTimeMillis(30000);
            dataSource.setMaxWait(10);
            dataSource.setInitialSize(2);
            dataSource.setMaxActive(10);
            dataSource.setTimeBetweenEvictionRunsMillis(30000);
            dataSource.setValidationQuery("SELECT 1");
            dataSource.setTestOnReturn(false);
            dataSource.setTestOnBorrow(true);
            dataSource.setTestWhileIdle(true);
        } catch (IOException e) {
            e.printStackTrace();
        }
        return dataSource;

    }

    // 将返回结果对象定义成一个name为sqlSessionFactory的bean
    @Bean(name = "sqlSessionFactory")
    public SqlSessionFactoryBean getSqlSesssionFactoryBean() {
        SqlSessionFactoryBean bean = new SqlSessionFactoryBean();
        bean.setDataSource(dataSource());
        /*
         * ClassPathResource re = new ClassPathResource("myBatisConfig.xml");
         * bean.setConfigLocation(re);
         */
        ResourcePatternResolver resolver = new PathMatchingResourcePatternResolver();
        Resource[] resources;
        try {
            // 设置MyBatis视图映射文件的路径
            resources = resolver.getResources("classpath:cn/com/mvn/ssm/demo/dao/mybatis/entity/*Mapper.xml");
            bean.setMapperLocations(resources);
        } catch (IOException e) {
            e.printStackTrace();
        }
        return bean;
    }

    // 创建Mapper和接口的绑定配置器Bean,名称为mapper
    @Bean(name = "mapper", autowire = Autowire.BY_NAME)
    public MapperScannerConfigurer getMapperScannerConfigurer() {
        MapperScannerConfigurer conf = new MapperScannerConfigurer();
        // 设置要绑定的接口基本包路径
        conf.setBasePackage("cn.com.mvn.ssm.demo.dao.mybatis.impl");
        // 设置连接数据库的sqlSessionFactory
        conf.setSqlSessionFactoryBeanName("sqlSessionFactory");
        return conf;
    }
}
IMvnDAO4MyBatis.java,继承前面定义的 DAO 接口,完成 MyBatis 接口定义。
package cn.com.mvn.ssm.demo.dao.mybatis.impl;
import cn.com.mvnb.ssh.demo.dao.IMvnUserDAO;

public interface IMvnUserDAO4MyBatis extends IMvnUserDAO {

}
MvnUserMapper.xml,MvnUser 实体的映射文件。
<?xml version="1.0" encoding="UTF-8"?>
<!DOCTYPE mapper PUBLIC "-//mybatis.org//DTD Mapper 3.0//EN"
     "http://mybatis.org/dtd/mybatis-3-mapper.dtd">
<mapper
    namespace="cn.com.mvn.ssm.demo.dao.mybatis.impl.IMvnUserDAO4MyBatis">
    <resultMap type="cn.com.mvn.ssh.demo.entity.MvnUser"
        id="UserMap">
        <id column="ur_id" property="urId" />
        <result column="ur_user_name" property="urUserName" />
        <result column="ur_password" property="urPassword" />
        <result column="ur_age" property="urAge" />
        <result column="ur_status" property="urStatus" />
    </resultMap>
    <insert id="addUser" useGeneratedKeys="true" keyProperty="urId"
        parameterType="cn.com.mvn.ssh.demo.entity.MvnUser">
        insert into mvn_user
        (ur_user_name,ur_password,ur_age,ur_status)
        values
        (#{urUserName},#{urPassword},#{urAge},#{urStatus})
    </insert>
    <update id="update"
        parameterType="cn.com.mvn.ssh.demo.entity.MvnUser">
        update mvn_user set
        ur_age=#{urAge},ur_status=#{urStatus} where
        ur_id=#{urId}
    </update>
    <delete id="deleteUser"
        parameterType="cn.com.mvn.ssh.demo.entity.MvnUser">
        delete from mvn_user where ur_id=#{urId}
    </delete>
    <select id="findUserById" resultMap="UserMap"
        parameterType="int">
        select * from mvn_user where ur_id=#{id}
    </select>
    <select id="findUserByUserName" resultMap="UserMap"
        parameterType="java.lang.String">
        select * from mvn_user where ur_user_name=#{userName}
    </select>
    <select id="findUsers" resultMap="UserMap">
        select * from mvn_user order by ur_id
    </select>
</mapper>
db.properties,数据库连接信息配置文件。
jdbc.username=root
jdbc.password=root
jdbc.url=jdbc:mysql://localhost:3306/mvn_db
jdbc.driverClassName=com.mysql.jdbc.Driver
4. 编写测试代码
测试代码是 TestMvnUserDAOImp.java 类,里面基于 JUnit 对 DAO 接口中的每个方法做了测试。为了完成它,同时避免 MyBatisDAO 集成到系统项目中的改动,添加了一个供 MvnUserDAOImpl 测试的服务类。里面不加业务逻辑,直接调用 DAO 接口中的方法,只是在类上面添加了事务管理。所以测试代码主要有以下几个部分。
1)IMvnUserService.java,临时测试用的服务层接口。
package cn.com.mvn.ssm.demo.mybatis.service;

import java.util.List;
import cn.com.mvn.ssh.demo.entity.MvnUser;

public interface IMvnUserService {
    /**
     * 在数据库中,添加一个新的MvnUser对象
     *
     * @param user 需要添加的用户实体对象,该对象需要有用户名、密码、年龄和状态属性
     *
     * @return void
     * @throws RuntimeException 添加失败或出现其它意外
     */
    public void addUser(MvnUser user);

    /**
     * 更新MvnUser对象。该对象中需要设置年龄、状态和id属性,属性和状态是要更新的新值,id为条件
     *
     * @param user 需要更新的MvnUser对象
     *
     * @return void
     * @throws RuntimeException 更新失败或出现其它意外
     */
    public void update(MvnUser user);

    /**
     * 删除MvnUser对象,该对象中需要有要删除对象的id属性,id属性为删除条件
     *
     * @param user 要删除的MvnUser对象
     *
     * @return void
     * @throws RuntimeException 删除失败或出现其它意外
     */
    public void deleteUser(MvnUser user);

    /**
     * 根据id查询对应的MvnUser对象
     *
     * @param id 要查询的MvnUser对象的id
     * @return MvnUser id对应的MvnUser对象,如果没有对象,返回null
     * @throws RuntimeException 出现意外情况
     */
    public MvnUser findUserById(int id);

    /**
     * 根据用户名查询对应的MvnUser对象
     *
     * @param userName 要查询的MvnUser对象的用户名
     * @return MvnUser 用户对应的MvnUser对象,如果没有对象,返回null
     * @throws RuntimeException 出现意外情况
     */
    public MvnUser findUserByUserName(String userName);

    /**
     * 查找数据库中所有的用户对象,以List集合的形式返回
     *
     * @return List<MvnUser> 所有用户对象的集合
     * @throws RuntimeException 出现意外情况
     */
    public List<MvnUser> findUsers();
}
2)MvnUserServiceImpl.java,临时测试的服务层实现类。
package cn.com.mvn.ssm.demo.mybatis.service.impl;

import java.util.List;

import org.springframework.beans.factory.annotation.Autowired;
import org.springframework.stereotype.Service;
import org.springframework.transaction.annotation.Transactional;

import cn.com.mvn.ssh.demo.dao.IMvnUserDAO;
import cn.com.mvn.ssh.demo.entity.MvnUser;
import cn.com.mvn.ssm.demo.mybatis.service.IMvnUserService;

@Service("userService")
@Transactional
public class MvnUserServiceImpl implements IMvnUserService {
    @Autowired
    private IMvnUserDAO userDAO;

    public void addUser(MvnUser user) {
        this.userDAO.addUser(user);
    }

    public void update(MvnUser user) {
        this.userDAO.update(user);
    }

    public void deleteUser(MvnUser user) {
        this.userDAO.deleteUser(user);
    }

    public MvnUser findUserById(int id) {
        return this.userDAO.findUserById(id);
    }

    public MvnUser findUserByUserName(String userName) {
        return this.userDAO.findUserByUserName(userName);
    }

    public List<MvnUser> findUsers() {
        return this.userDAO.findUsers();
    }
}
3)TestMvnUserDAOImpl.java,基于 JUnit 的单元测试类。
package cn.com.mvn.ssm.demo.dao.mybatis.impl;

import java.util.List;

import org.junit.After;
import org.junit.Before;
import org.junit.Test;
import org.springframework.context.ApplicationContext;
import org.springframework.context.support.ClassPathXmlApplicationContext;

import cn.com.mvn.ssh.demo.entity.MvnUser;
import cn.com.mvn.ssh.demo.entity.Status;
import cn.com.mvn.ssm.demo.mybatis.service.IMvnUserService;
import junit.framework.Assert;

public class TestMvnUserDAOImpl {
    private ApplicationContext ctx;
    private IMvnUserService userService;

    @Before
    public void init() {
        this.ctx = new ClassPathXmlApplicationContext("applicationContext.xml");
        this.userService = (IMvnUserService) ctx.getBean("userService");
    }

    @Test
    public void testAddUser() {
        MvnUser user = new MvnUser();
        user.setUrAge(11);
        user.setUrPassword("11");
        user.setUrStatus(Status.ACTIVE.getStatus());
        user.setUrUserName("myBatisUserName");
        this.userService.addUser(user);
        user = this.userService.findUserByUserName("myBatisUserName");
        Assert.assertTrue(user != null && user.getUrAge() == 11);
        this.userService.deleteUser(user);
    }

    @Test
    public void testDeleteUser() {
        MvnUser user = new MvnUser();
        user.setUrAge(11);
        user.setUrPassword("11");
        user.setUrStatus(Status.ACTIVE.getStatus());
        user.setUrUserName("myBatisUserName");
        this.userService.addUser(user);
        user = this.userService.findUserByUserName("myBatisUserName");
        this.userService.deleteUser(user);
        MvnUser u = this.userService.findUserByUserName("myBatisUserName");
        Assert.assertTrue(user != null && u == null);

    }

    @Test
    public void testFindUserById() {
        MvnUser user = this.userService.findUserById(1);
        Assert.assertEquals(user.getUrUserName(), "zhangsan");
    }

    @Test
    public void testFindByUserName() {
        MvnUser user = this.userService.findUserByUserName("zhangsan");
        Assert.assertEquals("123", user.getUrPassword());
    }

    @Test
    public void testFindUsers() {
        List<MvnUser> userList = this.userService.findUsers();
        Assert.assertTrue(userList.size() > 0);
    }

    @After
    public void destory() {
        this.userService = null;
        this.ctx = null;
    }
}
4)applicationContext.xml,测试的时候,Spring 的配置文件。
<?xml version="1.0" encoding="UTF-8"?>
<beans xmlns="http://www.springframework.org/schema/beans"
    xmlns:xsi="http://www.w3.org/2001/XMLSchema-instance"
    xmlns:mvc="http://www.springframework.org/schema/mvc"
    xmlns:context="http://www.springframework.org/schema/context"
    xsi:schemaLocation="http://www.springframework.org/schema/beans
        http://www.springframework.org/schema/beans/spring-beans-4.0.xsd
        http://www.springframework.org/schema/mvc
        http://www.springframework.org/schema/mvc/spring-mvc-4.0.xsd
        http://www.springframework.org/schema/context
        http://www.springframework.org/schema/context/spring-context-4.0.xsd">

    <context:component-scan base-package="cn.com.mvn" />
</beans>
5. 测试、安装和发布
同前面的类似。实现 Spring 的 Service 层模块
SSM 中的 Service 层实现同 SSH 框架中的 Service 层实现一样。唯一不同的是 DAO 的注入只能用 @Autowired 根据类型注入,不能用 @Qualifier 根据名称注入。因为前面 MyBatis DAO 的实现使用的是 MyBatis3 的新特征:接口和映射文件自动绑定,没有自己独立实现 DAO 类,更没有在 Spring 容器中配置 DAO Bean、指定 Bean 的名称。
MvnSSMDemo.Service.Impl 工程的实现步骤如下。
1. 创建 MvnSSMDemo.Service.Impl 工程
只需创建 Maven 的简单 Java 工程。2. 编写 pom.xml 骨架文件
pom 内容主要体现在以下几个方面。- 继承 SpringPOM 公共构件,避免重复配置对 Spring 相关构件的依赖。
- 添加 MvnSSHDemo.DAO 接口依赖和 MvnSSHDemo.Service 接口依赖。
- 为了方便测试,添加 MvnSSMDemo.DAO.MyBatis 依赖,scope 范围是 test。
pom.xml 的代码如下所示:
<project xmlns="http://maven.apache.org/POM/4.0.0"
    xmlns:xsi="http://www.w3.org/2001/XMLSchema-instance"
    xsi:schemaLocation="http://maven.apache.org/POM/4.0.0 http://maven.apache.org/xsd/maven-4.0.0.xsd">
    <modelVersion>4.0.0</modelVersion>
    <parent>
        <groupId>cn.com.mvn.pom</groupId>
        <artifactId>SpringPOM</artifactId>
        <version>0.0.1-SNAPSHOT</version>
    </parent>
    <groupId>cn.com.mvn.ssm.demo</groupId>
    <artifactId>MvnSSMDemo.Service.Impl</artifactId>
    <packaging>jar</packaging>

    <name>MvnSSMDemo.Service.Impl</name>
    <url>http://maven.apache.org</url>

    <properties>
        <project.build.sourceEncoding>UTF-8</project.build.sourceEncoding>
    </properties>

    <dependencies>
        <dependency>
            <groupId>cn.com.mvn.ssh.demo</groupId>
            <artifactId>MvnSSHDemo.DAO</artifactId>
            <version>0.0.1-SNAPSHOT</version>
        </dependency>
        <dependency>
            <groupId>cn.com.mvn.ssh.demo</groupId>
            <artifactId>MvnSSHDemo.Service</artifactId>
            <version>0.0.1-SNAPSHOT</version>
        </dependency>
        <dependency>
            <groupId>cn.com.mvn.ssm.demo</groupId>
            <artifactId>MvnSSMDemo.DAO.MyBatis</artifactId>
            <version>0.0.1-SNAPSHOT</version>
            <scope>test</scope>
        </dependency>
    </dependencies>
</project>
3. 编写实现代码
Service 层主要实现用户对象的 CRUD 功能,同 SSH 中的 Service 层的代码类似,唯一不同的是,对 DAO 对象的注入只能用 byType 的自动注入,不能用 byName。Service 层的内容如下。UserServiceImpl.java,实现用户的 CRUD 功能。
package cn.com.mvn.ssh.demo.service.impl;

import java.util.List;
import org.springframework.beans.factory.annotation.Autowired;
import org.springframework.stereotype.Service;
import org.springframework.transaction.annotation.Propagation;
import org.springframework.transaction.annotation.Transactional;

import cn.com.mvn.ssh.demo.dao.IMvnUserDAO;
import cn.com.mvn.ssh.demo.entity.MvnUser;
import cn.com.mvn.ssh.demo.service.IUserService;

//@Configuration
@Service("userService") // 注册成服务组件
@Transactional // 要求启动事务
public class UserServiceImpl implements IUserService {
    @Autowired // 自动根据类型注入
    // @Qualifier("userDAO") // 根据name注入
    private IMvnUserDAO userDAO;

    @Transactional(propagation = Propagation.REQUIRED) // 需要进行事务管理
    public void createUser(MvnUser user) {
        // 验证输入的用户是否为null
        if (user == null) {
            throw new RuntimeException("创建的user不能为null");
        }
        // 验证用户名是否有存在
        MvnUser u = this.userDAO.findUserByUserName(user.getUrUserName());
        if (u != null) {
            throw new RuntimeException(u.getUrUserName() + " 已经存在");
        }
        this.userDAO.addUser(user);
    }

    @Transactional(propagation = Propagation.REQUIRED) // 需要进行事务管理
    public void editUser(int age, String status, int id) {
        // 根据id找到以前的用户对象
        MvnUser user = this.userDAO.findUserById(id);
        // 判断用户是否存在,不存在抛异常,存在就更新
        if (user == null) {
            throw new RuntimeException("id为" + id + "用户不存在");
        } else {
            user.setUrAge(age);
            user.setUrStatus(status);
            this.userDAO.update(user);
        }
    }

    @Transactional(propagation = Propagation.REQUIRED) // 需要进行事务管理
    public void deleteUser(int id) {
        // 根据id找到以前的用户对象
        MvnUser user = this.userDAO.findUserById(id);
        // 判断用户是否存在,不存在抛异常,存在就删除
        if (user == null) {
            throw new RuntimeException("id为" + id + "用户不存在");
        } else {
            this.userDAO.deleteUser(user);
        }
    }

    @Transactional(readOnly = true) // 只读,不需要进行事务管理
    public MvnUser searchUser(int id) {
        MvnUser user = null;
        user = this.userDAO.findUserById(id);
        return user;
    }

    @Transactional(readOnly = true) // 只读,不需要进行事务管理
    public MvnUser searchUser(String userName) {
        MvnUser user = null;
        user = this.userDAO.findUserByUserName(userName);
        return user;
    }

    @Transactional(readOnly = true) // 只读,不需要进行事务管理
    public List<MvnUser> searchUsers() {
        List<MvnUser> userList = null;
        userList = this.userDAO.findUsers();
        return userList;
    }
}
4. 编写测试代码
MvnSSMDemo.Service.Impl 的测试代码有两个。1)TestUserServiceImpl.java
实现测试 UserServiceImpl.java 的 JUnit 代码,内容如下所示:
package cn.com.mvn.ssh.demo.service.impl;

import java.util.List;

import org.junit.After;
import org.junit.Before;
import org.junit.Test;
import org.springframework.context.ApplicationContext;
import org.springframework.context.support.ClassPathXmlApplicationContext;

import cn.com.mvn.ssh.demo.entity.MvnUser;
import cn.com.mvn.ssh.demo.entity.Status;
import cn.com.mvn.ssh.demo.service.IUserService;
import junit.framework.Assert;

public class TestUserServiceImpl {
    private IUserService userService;
    private ApplicationContext ctx = null;

    @Before
    public void init() {
        this.ctx = new ClassPathXmlApplicationContext("applicationContext.xml");
        this.userService = (IUserService) ctx.getBean("userService");
    }

    @Test
    public void testCreateUser() {
        MvnUser user = new MvnUser();
        user.setUrAge(11);
        user.setUrPassword("11");
        user.setUrStatus(Status.ACTIVE.getStatus());
        user.setUrUserName("service1");
        this.userService.createUser(user);
        MvnUser u = this.userService.searchUser("service1");
        boolean bool = u != null && u.getUrAge() == 11 && u.getUrStatus().equals(Status.ACTIVE.getStatus());
        Assert.assertTrue(bool);
        // 删除用户
        this.userService.deleteUser(u.getUrId());
    }

    @Test
    public void testEditUser() {
        MvnUser user = new MvnUser();
        user.setUrAge(11);
        user.setUrPassword("11");
        user.setUrStatus(Status.ACTIVE.getStatus());
        user.setUrUserName("service1");
        this.userService.createUser(user);
        MvnUser u = this.userService.searchUser("service1");
        this.userService.editUser(88, Status.INACTIVE.getStatus(), u.getUrId());
        u = this.userService.searchUser("service1");
        Assert.assertTrue(u.getUrAge() == 88 && u.getUrStatus().equals(Status.INACTIVE.getStatus()));
        this.userService.deleteUser(u.getUrId());
    }

    @Test
    public void testDeleteUser() {
        MvnUser user = new MvnUser();
        user.setUrAge(11);
        user.setUrPassword("11");
        user.setUrStatus(Status.ACTIVE.getStatus());
        user.setUrUserName("service1");
        this.userService.createUser(user);
        MvnUser u = this.userService.searchUser("service1");
        this.userService.deleteUser(u.getUrId());
        MvnUser u2 = this.userService.searchUser(u.getUrId());
        Assert.assertTrue(u != null && u2 == null);
    }

    @Test
    public void testSearchUserById() {
        MvnUser user = this.userService.searchUser(1);
        Assert.assertNotNull(user);
    }

    @Test
    public void testSearchUserByUserName() {
        MvnUser user = this.userService.searchUser("zhangsan");
        Assert.assertNotNull(user);
    }

    @Test
    public void testSearchUsers() {
        List<MvnUser> userList = this.userService.searchUsers();
        Assert.assertTrue(userList != null && userList.size() > 0);
    }

    @After
    public void destory() {
        this.userService = null;
        this.ctx = null;
    }
}
2)applicationContext.xml
测试时要初始化 Spring 容器。因为只在测试起作用,所以该文件要同前面的 TestUserServiceImpl.java 代码一样,放在 src/test 的对应子目录下,代码如下所示:
<?xml version="1.0" encoding="UTF-8"?>
<beans xmlns="http://www.springframework.org/schema/beans"
    xmlns:xsi="http://www.w3.org/2001/XMLSchema-instance"
    xmlns:mvc="http://www.springframework.org/schema/mvc"
    xmlns:context="http://www.springframework.org/schema/context"
    xsi:schemaLocation="http://www.springframework.org/schema/beans
        http://www.springframework.org/schema/beans/spring-beans-4.0.xsd
        http://www.springframework.org/schema/mvc
        http://www.springframework.org/schema/mvc/spring-mvc-4.0.xsd
        http://www.springframework.org/schema/context
        http://www.springframework.org/schema/context/spring-context-4.0.xsd">

    <context:component-scan base-package="cn.com.mvn" />
</beans>
5. 测试安装和发布
右击“工程”,选择 Run As→Maven test→install→deploy 命令完成测试安装和发布,发布完成后,Archiva 私服上可以看到 MvnSSMDemo.Service.Impl 的构件。实现 SpringMVC Web 模块
用户 CRUD 模块的 SSM Web 层实现,这里采用的是 SpringMVC 4.x 版本,用的是零配置方式实现的。所以要理解后面的代码实现需要有 SpringMVC 4.x 的开发基础,建议没有接触过的读者先参考 SpringMVC 4.0 注解开发 Web 应用的相关资料。
Web 层基于框架的开发流程可以抽象成以下几个部分。
- 在 web.xml 中配置框架的拦截入口,可能是过滤器,也可能是 servlet。
- 开发显示层代码一般是 jsp 页面。
- 开发控制层代码,实现接收请求数据,调用 service 处理请求数据,返回结果 view 层的标记。
- 通过配置文件描述框架运行时,对请求的处理代码的对应关系和页面转换流程。
基于 SpringMVC 4.x 用零配置方式开发 Web 层也是同样的流程。只是因为是零配置方式,也就看不到配置文件相关的代码,但是以前配置文件描述的信息肯定还是要描述的,只是用注解或其他方式体现。
对 SpringMVC Web 的实现思路有了基本了解后,接下来就开始实现 SSMDemo 的 Web 层功能。
1. 创建 Maven 的 Web 工程
前面大部分工程都是基于 Maven 的普通 Java 工程。这里要基于创建 Web 应用的插件创建 Web 工程,详细过程如下。单击 Maven 中的创建 Maven Project 的选项,如图 1 所示。
图 1 创建 Maven Project
单击 Next 按钮,进入 Archetype 的选择界面,选择 webapp-javaee6 插件,如图 2 所示。
图 2 选择webapp-javaee6
单击 Next 按钮,进入类似如图 3 所示的界面,在界面中输入工程的 Group Id、Artifact Id、Package,选择一个 Version 版本。
图 3 输入项目坐标
单击 Finish 按钮,创建 Web 工程,项目就创建好了。
2. 编写和完善 pom.xml
用户 CRUD 的模块实现,需要有 Spring 和 Spring web,Spring webmvc 的相关 jar 包,同时还需要在前面阶段开发的 MvnSSHDAO.DAO 和 MvnSSHService.Service 定义的接口上进行开发,MvnSSMDAO.MyBatis 和 MvnSSMService.Service.Impl 的实现基础上进行测试。所以 pom.xml 中主要体现在对 SpringPOM 父 pom 构件的继承和对后面四个构件的依赖。
另外,为了发布到 Web 服务器上运行,需要配置 cargo-maven2-plugin 插件。
pom.xml 详细内容如下:
<project xmlns="http://maven.apache.org/POM/4.0.0"
    xmlns:xsi="http://www.w3.org/2001/XMLSchema-instance"
    xsi:schemaLocation="http://maven.apache.org/POM/4.0.0 http://maven.apache.org/xsd/maven-4.0.0.xsd">
    <modelVersion>4.0.0</modelVersion>
    <parent>
        <groupId>cn.com.mvn.pom</groupId>
        <artifactId>SpringMVCPOM</artifactId>
        <version>0.0.1-SNAPSHOT</version>
    </parent>
    <groupId>cn.com.mvn.ssm.demo</groupId>
    <artifactId>MvnSSMDemo.SpringMVC</artifactId>
    <packaging>war</packaging>

    <name>MvnSSMDemo.SpringMVC</name>
    <url>http://maven.apache.org</url>

    <dependencies>

        <dependency>
            <groupId>cn.com.mvn.ssh.demo</groupId>
            <artifactId>MvnSSHDemo.Service</artifactId>
            <version>0.0.1-SNAPSHOT</version>
        </dependency>
        <!-- 接口和实现 -->
        <dependency>
            <groupId>cn.com.mvn.ssm.demo</groupId>
            <artifactId>MvnSSMDemo.Service.Impl</artifactId>
            <version>0.0.1-SNAPSHOT</version>
        </dependency>
        <dependency>
            <groupId>cn.com.mvn.ssm.demo</groupId>
            <artifactId>MvnSSMDemo.DAO.MyBatis</artifactId>
            <version>0.0.1-SNAPSHOT</version>
        </dependency>
        <dependency>
            <groupId>cn.com.mvn.ssh.demo</groupId>
            <artifactId>MvnSSHDemo.DAO</artifactId>
            <version>0.0.1-SNAPSHOT</version>
        </dependency>
    </dependencies>

    <build>
        <plugins>

            <!-- Cargo插件 -->
            <plugin>
                <!-- 指定插件名称及版本号 -->
                <groupId>org.codehaus.cargo</groupId>
                <artifactId>cargo-maven2-plugin</artifactId>
                <version>1.4.8</version>
                <configuration>
                    <wait>true</wait>       <!--是否说明,操作start、stop等后续操作必须等前面操作完成才能继续 -->
                    <container>               <!-- 容器的配置 -->
                        <containerId>tomcat7x</containerId>                     <!-- 指定tomcat版本 -->
                        <type>installed</type>                                  <!-- 指定类型:standalone, installed等 -->
                        <home>C:\java\servers\apache-tomcat-7.0.69_64</home>    <!-- 指定Tomcat的位置,即catalina.home -->
                    </container>
                    <configuration>           <!-- 具体的配置 -->
                        <type>existing</type>                                   <!-- 类型,existing:存在 -->
                        <home>C:\java\servers\apache-tomcat-7.0.69_64</home>    <!-- Tomcat的位置,即catalina.home -->
                    </configuration>
                    <deployables>                                 <!-- 部署设置 -->
                        <deployable>                              <!-- 部署的War包名等 -->
                            <groupId>cn.com.mvn.ssm.demo</groupId>
                            <artifactId>MvnSSMDemo.SpringMVC</artifactId>
                            <type>war</type>
                            <properties>
                                <context>MvnSSMDemo</context>   <!-- 部署路径 -->
                            </properties>
                        </deployable>
                    </deployables>
                    <deployer>                                            <!-- 部署配置 -->
                        <type>installed</type>                          <!-- 类型 -->
                    </deployer>
                </configuration>
                <executions>
                    <!-- 执行的动作 -->
                    <execution>
                        <id>verify-deployer</id>
                        <phase>install</phase>      <!-- 解析install -->
                        <goals>
                            <goal>deployer-deploy</goal>
                        </goals>
                    </execution>
                    <execution>
                        <id>clean-deployer</id>
                        <phase>clean</phase>
                        <goals>
                            <goal>deployer-undeploy</goal>
                        </goals>
                    </execution>
                </executions>
            </plugin>
        </plugins>
    </build>
    <distributionManagement>
        <repository>
            <id>archivaServer</id>
            <url>http://localhost:8080/repository/internal</url>
        </repository>
        <snapshotRepository>
            <id>archivaServer</id>
            <url>http://localhost:8080/repository/snapshots</url>
        </snapshotRepository>
    </distributionManagement>
</project>
3. 编写实现代码
SpringMVC Web 的代码列表和对应的作用描述如下。1)SpringMVCIntializer.java。在 Web 容器中初始化 DispatcherServlet。Web 服务器启动时会自己调用初始化,代替以前在 web.xml 中配置 DispatcherServlet 的 servlet 和 servlet-mapping。
package cn.com.mvn.ssm.demo.web.configuration;

import org.springframework.web.servlet.support.AbstractAnnotationConfigDispatcherServletInitializer;

//继承初始化父类,让web服务器能自动识别,初始化SpringMVC Servlet入口组件
//代替在web.xml中配置org.springframework.web.servlet.DispatcherServlet
public class SpringMVCInitializer extends AbstractAnnotationConfigDispatcherServletInitializer {
    @Override
    protected Class<?>[] getRootConfigClasses() {
        // 加载SpringMVC的基本配置类
        return new Class[] { SpringMVCConfiguration.class };
    }

    @Override
    protected Class<?>[] getServletConfigClasses() {
        return null;
    }

    @Override
    protected String[] getServletMappings() {
        // 指定SpringMVC的mapping url-pattern
        return new String[] { "/" };
    }
}
2)SpringMVCConfiguration.java。完成 SpringMVC 框架运行的基本信息配置,包括视图转换器、类型转换器、多国语言的资源文件、请求路径匹配和不被 SpringMVC 框架拦截的请求等。
package cn.com.mvn.ssm.demo.web.configuration;

import java.util.ArrayList;
import java.util.List;

import org.springframework.context.MessageSource;
import org.springframework.context.annotation.Bean;
import org.springframework.context.annotation.ComponentScan;
import org.springframework.context.annotation.Configuration;
import org.springframework.context.support.ResourceBundleMessageSource;
import org.springframework.format.FormatterRegistry;
import org.springframework.http.converter.json.MappingJackson2HttpMessageConverter;
import org.springframework.web.servlet.config.annotation.EnableWebMvc;
import org.springframework.web.servlet.config.annotation.PathMatchConfigurer;
import org.springframework.web.servlet.config.annotation.ResourceHandlerRegistry;
import org.springframework.web.servlet.config.annotation.ViewResolverRegistry;
import org.springframework.web.servlet.config.annotation.WebMvcConfigurerAdapter;
import org.springframework.web.servlet.view.InternalResourceViewResolver;
import org.springframework.web.servlet.view.JstlView;

@Configuration
@EnableWebMvc // 支持SpringMVC
@ComponentScan(basePackages = "cn.com.mvn") // SpringMVC自动扫描组件类的基本包
public class SpringMVCConfiguration extends WebMvcConfigurerAdapter {
    @Override
    public void configureViewResolvers(ViewResolverRegistry registry) {
        // 注册视图转换器
        InternalResourceViewResolver viewResolver = new InternalResourceViewResolver();
        viewResolver.setViewClass(JstlView.class);
        viewResolver.setPrefix("/");
        viewResolver.setSuffix(".jsp");
        registry.viewResolver(viewResolver);
    }

    /*
     * Configure ResourceHandlers to serve static resources like CSS/ Javascript
     * etc...
     *
     */
    @Override
    public void addResourceHandlers(ResourceHandlerRegistry registry) {
        // 设置不需要经过SpringMVC框架过滤的资源,比如js css 和 images等
        registry.addResourceHandler("/static/**").addResourceLocations("/static/");
        registry.addResourceHandler("/js/**").addResourceLocations("/js/");
    }

    /*
     * Configure Converter to be used. In our example, we need a converter to
     * convert string values[Roles] to UserProfiles in newUser.jsp
     */
    @Override
    public void addFormatters(FormatterRegistry registry) {
        // registry.addConverter(roleToUserProfileConverter);
    }

    /**
     * Configure MessageSource to lookup any validation/error message in
     * internationalized property files
     */
    @Bean
    public MessageSource messageSource() {
        // 添加资源文件(多国语言)
        ResourceBundleMessageSource messageSource = new ResourceBundleMessageSource();
        messageSource.setBasename("messages");
        return messageSource;
    }

    /**
     * Optional. It's only required when handling '.' in @PathVariables which
     * otherwise ignore everything after last '.' in @PathVaidables argument. It's a
     * known bug in Spring [https://jira.spring.io/browse/SPR-6164], still present
     * in Spring 4.1.7. This is a workaround for this issue.
     */
    @Override
    public void configurePathMatch(PathMatchConfigurer matcher) {
        matcher.setUseRegisteredSuffixPatternMatch(true);
    }
}
3)Message.java。定义 VO 类,封装页面提示信息,主要是 id 和 message。
package cn.com.mvn.ssm.demo.web.vo;

public class Message {
    private String code;
    private String message;

    public Message(String message) {
        super();
        this.message = message;
    }

    public String getCode() {
        return code;
    }

    public void setCode(String code) {
        this.code = code;
    }

    public String getMessage() {
        return message;
    }

    public void setMessage(String message) {
        this.message = message;
    }
}
4)UserController.java。实现用户 CRUD 的所有控制逻辑代码,包括请求映射注解的描述。
package cn.com.mvn.ssm.demo.web.controller;

import org.springframework.beans.factory.annotation.Autowired;
import org.springframework.beans.factory.annotation.Qualifier;
import org.springframework.stereotype.Controller;
import org.springframework.web.bind.annotation.PathVariable;
import org.springframework.web.bind.annotation.RequestMapping;
import org.springframework.web.bind.annotation.RequestParam;
import org.springframework.web.bind.annotation.ResponseBody;
import org.springframework.web.servlet.ModelAndView;

import cn.com.mvn.ssh.demo.entity.MvnUser;
import cn.com.mvn.ssh.demo.service.IUserService;
import cn.com.mvn.ssm.demo.web.vo.Message;

@Controller("userController")
@RequestMapping("/user")
public class UserController {
    @Autowired
    @Qualifier("userService")
    private IUserService userService;

    @RequestMapping("/add")
    @ResponseBody
    public Message addUser(MvnUser user) {
        Message msg = new Message("添加成功");
        try {
            this.userService.createUser(user);
        } catch (Exception e) {
            e.printStackTrace();
            msg.setMessage("添加失败:" + e.getMessage());
        }
        return msg;
    }

    @RequestMapping("/delete")
    @ResponseBody
    public Message deleteUser(int id) {
        Message msg = new Message("删除成功");
        try {
            this.userService.deleteUser(id);
        } catch (Exception e) {
            e.printStackTrace();
            msg.setMessage("删除失败:" + e.getMessage());
        }
        return msg;
    }

    @RequestMapping("/edit")
    @ResponseBody
    public Message editUser(@RequestParam("status") String status, @RequestParam("age") int age,
            @RequestParam("id") int id) {
        Message msg = new Message("修改成功");
        try {
            this.userService.editUser(age, status, id);
        } catch (Exception e) {
            e.printStackTrace();
            msg.setMessage("修改失败:" + e.getMessage());
        }
        return msg;
    }

    @RequestMapping("/searchUser")
    @ResponseBody
    public MvnUser searchUser(@RequestParam("id") int id) {
        MvnUser user = this.userService.searchUser(id);
        return user;
    }

    @RequestMapping("/searchUsers")
    public ModelAndView searchUsers() {
        ModelAndView mv = new ModelAndView();
        mv.setViewName("userList");
        mv.addObject("userList", this.userService.searchUsers());
        return mv;
    }
}
5)index.jsp。CRUD 的框架页面,里面包含 CRUD 的操作按钮和内嵌用户列表的 Div,还有每个操作对应的 JS 代码。
<%@page contentType="text/html" pageEncoding="UTF-8"%>
<%@taglib uri="http://java.sun.com/jsp/jstl/core" prefix="c"%>
<html>
<head>
<meta http-equiv="Content-Type" content="text/html; charset=utf-8">
<title>测试用户CRUD操作</title>
<script type="text/javascript" src="js/jquery-3.2.1.min.js"></script>
<script type="text/javascript">
$(document).ready(function() {
// 页面加载完后,自动发searchUsersServlet请求,加载到userListDiv中显示
$("#userListDiv").load("user/searchUsers");
});
// 新增 按钮事件触发函数
function toAdd() {
// 获取addForm中的请求信息
var _data = $("#addForm").serialize();
//alert(_data);
// 发添加新用户的Ajax请求
$.ajax({
type : 'post',
url : 'user/add',
data : _data,
dataType : 'json', // 指定返回数据的格式:json
success : function(msg) {
alert(msg.message);
// 更新最新的用户列表信息
$("#userListDiv").load("user/searchUsers");
}
});
}
function toEdit() {
var _data = $("#editForm").serialize();
alert(_data);
$.ajax({
type : 'post',
url : 'user/edit',
data : _data,
dataType : 'json',
success : function(msg) {
alert(msg.message);
$("#userListDiv").load("user/searchUsers");
}
});
}
function toDelete() {
var chks = $("input[name='checkbox']:checked");
if (chks.length == 0) {
alert("请选择要删除的用户");
} else if (chks.length > 1) {
alert("一次只能删除一个用户");
} else {
var to = confirm("您确定要删除选中的用户?");
if (to) {
var _data = "id=" + chks.val();
$.ajax({
type : 'post',
data : _data,
url : 'user/delete',
dataType : 'json',
success : function(msg) {
alert(msg);
$("#userListDiv").load("user/searchUsers");
}
});
}
}
}
function toShowAdd() {
$("#LayerAdd").show(1000);
}
function toShowEdit() {
//alert($("input[name='checkbox']:checked").length);
var chks = $("input[name='checkbox']:checked");
if (chks.length == 0) {
alert("请选择要编辑的用户");
} else if (chks.length > 1) {
alert("一次只能修改一个用户");
} else {
var _data = "id=" + chks.val();
$.ajax({
type : 'post',
data : _data,
url : 'user/searchUser',
dataType : 'json',
//contentType:'application/json;charset=UTF-8',
success : function(msg) {
$("#editForm #id").val(msg.urId);
$("#editForm #userName").val(msg.urUserName);
$("#editForm #age").val(msg.urAge);
$("#editForm #status").val(msg.urStatus);
//alert($("#editForm #age").val());
$("#LayerEdit").show(1000);
}
});
}
}
function toCloseAdd() {
$("#LayerAdd").hide(1000);
}
function toCloseEdit() {
$("#LayerEdit").hide(1000);
}
</script>
<style type="text/css">
<!--
.STYLE2 {
color: #000000
}
#LayerAdd {
position: absolute;
left: 113px;
top: 183px;
width: 434px;
height: 193px;
z-index: 1;
background-color: #99FFFF;
display: none;
}
#LayerEdit {
position: absolute;
left: 113px;
top: 183px;
width: 434px;
height: 193px;
z-index: 1;
background-color: #99FFFF;
display: none;
}
-->
</style>
</head>
<body>
<div id="LayerAdd">
<form name="addForm" name="addForm" id="addForm" method="post" action="">
<table width="98%" border="0" align="center" cellpadding="0" cellspacing="0">
<tr>
<td colspan="2" align="center">
<strong><BR>添加新用户<br></strong>
</td>
</tr>
<tr>
<td width="47%" align="right">用户名:</td>
<td width="53%">
<input name="urUserName" type="text" id="userName">
</td>
</tr>
<tr>
<td align="right">密码:</td>
<td>
<input name="urPassword" type="password" id="password">
</td>
</tr>
<tr>
<td align="right">年龄:</td>
<td>
<input name="urAge" type="text" id="age">
</td>
</tr>
<tr>
<td colspan="2"> </td>
</tr>
<tr>
<td colspan="2" align="center">
<input type="button" name="Submit4" value="添加" onclick="toAdd()">
<input type="button" name="Submit5" value="关闭" onclick="toCloseAdd()">
</td>
</tr>
</table>
</form>
</div>
<div id="LayerEdit">
<form name="editForm" id="editForm" method="post" action="">
<input type="hidden" name="id" id="id" />
<table width="98%" border="0" align="center" cellpadding="0" cellspacing="0">
<tr>
<td colspan="2" align="center">
<strong><br>修改用户信息<br> </strong>
</td>
</tr>
<tr>
<td width="47%" align="right">用户名:</td>
<td width="53%">
<input name="userName" type="text" id="userName" readonly="readonly">
</td>
</tr>
<tr>
<td align="right">年龄:</td>
<td>
<input name="age" type="text" id="age">
</td>
</tr>
<tr>
<td align="right">状态:</td>
<td>
<select name="status" id="status">
<option value="Active">Active</option>
<option value="Inactive">Inactive</option>
<option value="Locked">Locked</option>
<option value="Deleted">Deleted</option>
</select>
</td>
</tr>
<tr>
<td colspan="2"> </td>
</tr>
<tr>
<td colspan="2" align="center">
<input type="button" name="Submit4" value="修改" onclick="toEdit()">
<input type="button" name="Submit5" value="关闭" onclick="toCloseEdit()">
</td>
</tr>
</table>
</form>
</div>
<p> </p>
<p>测试用户CRUD页面</p>
<table width="539" border="1">
<tr>
<td colspan="5" align="right">
<input type="button" name="Submit" value="新增" onclick="toShowAdd()">
<input type="submit" name="Submit2" value="修改" onclick="toShowEdit()">
<input type="button" name="Submit3" value="删除" onclick="toDelete()">
</td>
</tr>
<tr>
<td>
<div id="userListDiv"></div>
</td>
</tr>
</table>
<p> </p>
</body>
</html>
6)userList.jsp。显示用户列表的页面。
<%@page contentType="text/html" pageEncoding="UTF-8"%>
<%@taglib uri="http://java.sun.com/jsp/jstl/core" prefix="c"%>

<table width="100%" border="1">
    <tr>
        <td width="51" bgcolor="#CCCCCC">
            <div align="center">
                <strong><span class="STYLE2">选择</span></strong>
            </div>
        </td>
        <td width="111" bgcolor="#CCCCCC">
            <div align="center">
                <strong>序号</strong>
            </div>
        </td>
        <td width="137" bgcolor="#CCCCCC">
            <div align="center">
                <strong>用户名</strong>
            </div>
        </td>
        <td width="105" bgcolor="#CCCCCC">
            <div align="center">
                <strong>年龄</strong>
            </div>
        </td>
        <td width="101" bgcolor="#CCCCCC">
            <div align="center">
                <strong>状态</strong>
            </div>
        </td>
    </tr>

    <c:forEach items="${userList }" var="_user" varStatus="status">
        <c:choose>
            <c:when test="${status.index%2==0 }">
                <tr bgcolor="#FFFFFF">
            </c:when>
            <c:otherwise>
                <tr bgcolor="#99FFFF">
            </c:otherwise>
        </c:choose>
        <td>
            <input type="checkbox" name="checkbox" value="${_user.urId }">
        </td>
        <td>${status.index+1 }</td>
        <td>${_user.urUserName }</td>
        <td>${_user.urAge }</td>
        <td>${_user.urStatus }</td>
        </tr>
    </c:forEach>
</table>
7)Jquery-3.2.1.min.js。jQuery 的 JS,CRUD 操作的时候需要实现逻辑 JS 代码,都是基于它来的。该文件放在 JS 目录下,千万不要遗忘。4. 编译、测试、安装、发布和启动服务器
编译、测试、安装和发布同前面模块项目的操作一样。具体操作都是:右击“工程”,选择 Run As→Maven test→install→deploy 命令。
发布好后,在 Tomcat 的 webapps 发布目录下会有 MvnSSMDemo.war 文件,启动 Tomcat 就可以自动发布 Web 应用。
整合成SSM
前面以分模块的方式实现了每个功能,包括公共 DAO、Service 接口的定义,基于 MyBatis 的 DAO 实现,Service 的独立实现,还有基于 SpringMVC 的 Web 层实现,并且能够集成到 SpringMVC 的 Web 层代码中共同完成测试。但是为了方便管理,有必要创建一个工程,将前面独立实现的各个模块管理起来。这样每次编译、测试、安装和发布的时候都能基于 Maven 实现自动同步。
整合 SSM 模块的具体步骤如下。
1. 创建工程
只需创建一个简单的 Java 工程,按当初的设计输入 groupId 和 artifactId 与版本。这里的 demo 分别是 cn.com.mvn.ssm.demo、MvnSSMDemo 和 0.0.1-SNAPSHOT。2. 配置 pom.xml
打开 pom.xml,在里面添加包含的模块,并且设置 packaging 为 pom。前面介绍的是基于编辑器直接编写 pom.xml,这里介绍基于 MyEclipse 的图形化界面,基于向导界面修改 pom.xml(添加模块)。
通过单击不同标签选择打开方式,如图 4 所示。
图 4 pom.xml
如果选择的是 pom.xml,显示的是 pom.xml 源文件,可以按以前的方式基于源代码修改 pom.xml。现在选择 Overview 标签,显示界面如图 5 所示。
图 5 可视化pom.xml
单击 Modules 范围内的 Add… 按钮就可以通过图形界面选择需要添加的模块。保存后就完成了模块的集成。
3. 编译、测试、安装和发布
这个步骤同前面 SSH 集成后操作的步骤一样,请参考 SSH 集成里面最后的对应步骤。所有教程
- C语言入门
- C语言编译器
- C语言项目案例
- 数据结构
- C++
- STL
- C++11
- socket
- GCC
- GDB
- Makefile
- OpenCV
- Qt教程
- Unity 3D
- UE4
- 游戏引擎
- Python
- Python并发编程
- TensorFlow
- Django
- NumPy
- Linux
- Shell
- Java教程
- 设计模式
- Java Swing
- Servlet
- JSP教程
- Struts2
- Maven
- Spring
- Spring MVC
- Spring Boot
- Spring Cloud
- Hibernate
- Mybatis
- MySQL教程
- MySQL函数
- NoSQL
- Redis
- MongoDB
- HBase
- Go语言
- C#
- MATLAB
- JavaScript
- Bootstrap
- HTML
- CSS教程
- PHP
- 汇编语言
- TCP/IP
- vi命令
- Android教程
- 区块链
- Docker
- 大数据
- 云计算