netwox网络工具集入门教程
netwox 是由 lauconstantin 开发的一款网络工具集,适用群体为网络管理员和网络黑客,它可以创造任意的 TCP、UDP 和 IP 数据报文,以实现网络欺骗,并且可以在 Linux 和 Windows 系统中运行。
netwox 可以在命令模式下使用,也可以在 GUI中 使用 netwag 调用。
netwox 包含了超过 200 个不同的功能,这里被称为模块。每个模块都有一个特定的编号,使用不同的编号模块来实现不同的功能。
由于后面的章节需要结合 netwox 工具来实现各种功能,所以这里讲解该工具的安装及基本使用方法。
下载及安装
Kali Linux 系统自带 netwox 工具,而 Windows 系统默认没有安装。因此,本节将讲解如何在 Windows 系统中安装 netwox 工具。安装方法如下:1) 访问网址 https://sourceforge.net/projects/ntwox/,进入 netwox 下载页面,如图所示。图中显示了可下载的版本,从这里可以看到当前的最新版本为 5.39。
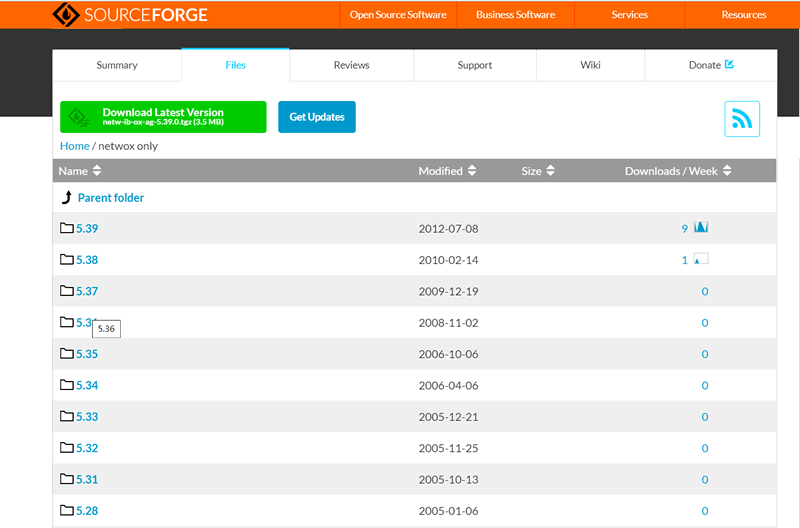
2) 下载最新版本,单击 Download Latest Version 按钮进行下载。成功下载后,下载的是一个压缩包,名称为 netw-ib-ox-ag-5.39.0.tgz。
3) 解压 netw-ib-ox-ag-5.39.0.tgz 安装包,在解压的文件夹中找到对应的应用程序文件 installwindows.exe。双击该文件进行安装,会弹出“安装确认”对话框,如图所示。
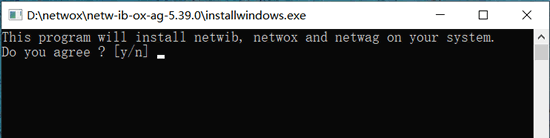
4) 同意在该系统中安装。输入 y,并回车,将显示其他需要确认的信息。这里,一律输入 y 并回车即可,信息如下:
This program will install netwib, netwox and netwag on your system.
Do you agree ? [y/n] y
Setting global variables.
Version...
Version=539
InstallDir...
InstallDir=C:\Program Files (x86)\netw\netw539
Do you agree to use this installation directory ? [y/n] y #确认安装的目录
Copying files under C:\Program Files (x86)\netw\netw539
src\netwox-bin_windows\netwib539.dll
src\netwox-bin_windows\netwox539.exe
src\netwag-bin_windows\netwag539.tcl
src\netwib-bin_windows\dll
src\netwib-bin_windows\include
src\netwib-bin_windows\lib
src\netwib-doc_html\*
src\netwox-doc_html\*
src\netwag-doc_html\*
Do you agree to place shortcuts on desktop ? [y/n] y #确认是否创建桌面快捷键
Do you agree to place shortcuts in start menu ? [y/n] y #确认是否在开始菜单中创建快捷键
Press any key to terminate
5) 上述代码中的最后一行信息表示按任意键终止,即表示安装完成。此时在“开始”菜单中可以查看到安装的 netwox 工具,如图所示。

层次结构分析
成功安装了 netwox 工具以后就可以使用了。由于该工具提供了众多模块,为了方便用户对模块的查找和使用,netwox 对这些模块以分类的方式进行了整理,以层次结构(如主菜单、子菜单)的方式进行显示,供用户查找和使用。使用该工具之前,需要了解分类的这些层次结构。下面将对层次结构进行分析。在“开始”菜单中,选择 netwox 命令,运行 netwox 工具,如图所示。
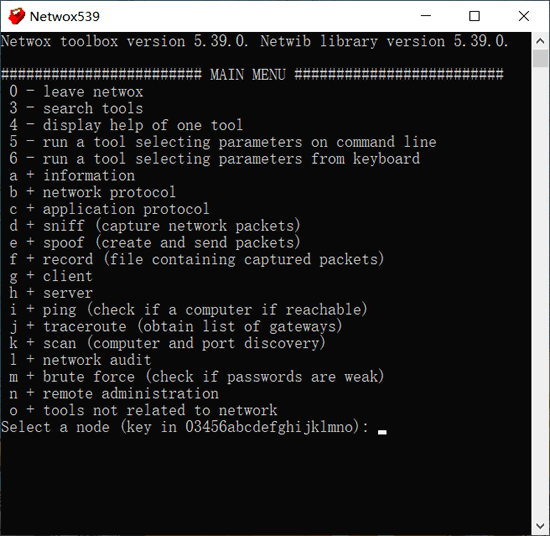
上图中显示了该工具的主菜单。每一行表示一个菜单项,第一个字符为该菜单的快捷键。每个菜单含义如下:
- 0:退出 netwox 工具。
- 3:搜索工具,用来搜索与指定信息相关的模块。
- 4:显示指定模块的帮助信息。
- 5:在命令行中输入指定模块的参数选项并运行。
- 6:从键盘输入指定模块的参数选项并运行。
- a:显示信息。
- b:显示网络协议下相关的模块。
- c:显示应用程序协议下相关的模块。
- d:显示与嗅探数据包相关的模块。
- e:显示与创建和发送数据包相关的模块。
- f:显示与进行数据包记录相关的模块。
- g:显示与客户端相关的模块。
- h:显示与服务器相关的模块。
- i:显示与检测主机连通性相关的模块。
- j:显示与路由跟踪相关的模块。
- k:显示与扫描计算机和端口相关的模块。
- l:显示与审计相关的模块。
- m:显示与暴力破解相关的模块。
- n:显示与远程管理相关的模块。
- o:显示其他模块。
以上菜单项是 netwox 工具的总体分类,每个菜单项属于一个大类。而每个菜单项中还会有子菜单,而每个子菜单下又有一个小的分类。
2) 使用快捷键 e,查看创建和发送数据包的相关模块,输出信息如下:
Select a node (key in 03456abcdefghijklmno): e
############# spoof (create and send packets) ##############
#创建和发送数据包模块
0 - leave netwox
1 - go to main menu
2 - go to previous menu
3 - search tools
4 - display help of one tool
5 - run a tool selecting parameters on command line
6 - run a tool selecting parameters from keyboard
a + Ethernet spoof
b + IP spoof
c + UDP spoof
d + TCP spoof
e + ICMP spoof
f + ARP spoof
3) 使用快捷键 c,查看创建和发送 UDP 数据包的模块,输出信息如下:
Select a node (key in 0123456abcdef): c
######################## UDP spoof #########################
#创建和发送UDP数据包
0 - leave netwox
1 - go to main menu #返回主菜单
2 - go to previous menu #返回上一个菜单
3 - search tools
4 - display help of one tool
5 - run a tool selecting parameters on command line
6 - run a tool selecting parameters from keyboard
a - 35:Spoof EthernetIp4Udp packet
b - 39:Spoof Ip4Udp packet
c - 43:Spoof of packet samples : fragment, ip4opt:noop
d - 44:Spoof of packet samples : fragment, ip4opt:rr
e - 45:Spoof of packet samples : fragment, ip4opt:lsrr
f - 46:Spoof of packet samples : fragment, ip4opt:ts
g - 47:Spoof of packet samples : fragment, ip4opt:ipts
h - 48:Spoof of packet samples : fragment, ip4opt:ippts
i - 141:Spoof EthernetIp6Udp packet
j - 145:Spoof Ip6Udp packet
k - 192:Spoof of packet samples : fragment, ip4opt:ssrr
如果使用该模块,可以使用快捷键 b;如果用户想退出当前分类,可以使用快捷键 1 返回主菜单,或使用快捷键 2 返回上一个菜单;使用快捷键 0 退出 netwox 工具。以类似的方法,可以查看其他分类中的模块。
使用搜索功能
虽然 netwox 工具对所有模块进行了整理和分类,但是有时候想找到要使用的模块也会很麻烦。因此,netwox 提供了搜索功能。用户可以指定关键字搜索与之相关的模块。例如,搜索与 DNS 相关的模块。在主菜单界面中输入 3,显示信息如下:
Select a node (key in 03456abcdefghijklmno): 3
Enter search string:
例如,这里输入 dns 然后回车,将显示与 DNS 相关的模块,输出信息如下:
Enter search string: dns
############ list of tools containing this text ############
Tools containing "dns":
102:Query a DNS server
103:Obtain version of a Bind DNS server
104:DNS server always answering same values
105:Sniff and send DNS answers
使用模块
上面介绍了如何查找要使用的模块。找到要使用的模块编号以后就可以进行使用了。本节将以一个模块为例,简单地介绍其使用方法。无论使用哪个模块,基本语法是不会变的。语法格式如下:
neywox ID options
其中,ID 表示模块对应的编号,是必需的;options 表示可用到的选项,是可选的。演示使用编号为 1 的模块,实现对应的功能。
1) 启动 netwox 工具。然后在主菜单界面中按快捷键 5,显示信息如下:
Select a node (key in 03456abcdefghijklmno): 5
Select tool number (between 1 and 223):
2) 本例使用第 1 个模块,输入 1 然后回车,将显示该模块的帮助信息,并在帮助信息下面会给出使用模块的命令。
输出信息如下:
Select tool number (between 1 and 223): 1
################## running tool number 1 ###################
Title: Display network configuration #功能简单介绍
+--------------------------------------------------------------------------------------------------------------+
| This tool displays network configuration: | #功能详细说明
| - the list of devices/interfaces: |
| + nu: device number |
| + dev: easy device name |
··· #省略其他信息
| - the routes |
| + nu: device number of device associated to this entry |
| + destination/netmask: destination addresses |
| If no Parameter is set, they are all displayed. |
| |
| This tool may need to be run with admin privilege in order to obtain |
| full network configuration. |
+-------------------------------------------------------------+
Synonyms: address, arp, device, gateway, ifconfig, interface, ipconfig, mac,
neighbor, netmask, route, show
Usage: netwox 1 [-d|+d] [-i|+i] [-a|+a] [-r|+r] #语法格式
Parameters: #可用的选项参数
-d|--devices|+d|--no-devices display devices
-i|--ip|+i|--no-ip display ip addresses
-a|--arpcache|+a|--no-arpcache display arp cache and neighbors
-r|--routes|+r|--no-routes display routes
Example: netwox 1 #参考实例
Enter optional tool parameters and press Return key.
netwox 1
输出信息的最后一行是用户使用到的命令。我们要使用的模块为 1,因此给出的命令信息为 netwox 1。
这里还可以输入可使用的选项。如果选项不是必须的,可以不输入选项。
3) 本例中,使用选项 -i 表示获取 IP 地址信息。在 netwox 1 后面输入 -i 然后回车,将执行模块功能。运行结果如下:
netwox 1 -i
nu ip /netmask ppp point_to_point_with
1 127.0.0.1 /255.0.0.0 0
2 192.168.59.1 /255.255.255.0 0
5 192.168.12.102 /255.255.255.0 0
7 192.168.38.1 /255.255.255.0 0
13 192.168.12.102 /255.255.255.0 0
25 192.168.38.1 /255.255.255.0 0
26 192.168.59.1 /255.255.255.0 0
9 127.0.0.1 /255.0.0.0 0
Command returned 0 (OK)
Press 'r' or 'k' to run again this tool, or any other key to continue
温馨提示
在 Windows 系统中使用 netwox 工具,需要按照以上模式运行工具。在 Linux 系统中,用户可以直接在命令行中,使用 netwox 命令 + 模块编号方式来直接使用,无须进行菜单操作。例如,在 Linux 系统中使用编号为 1 的模块,直接执行如下命令:
netwox 1 -i
所有教程
- C语言入门
- C语言编译器
- C语言项目案例
- 数据结构
- C++
- STL
- C++11
- socket
- GCC
- GDB
- Makefile
- OpenCV
- Qt教程
- Unity 3D
- UE4
- 游戏引擎
- Python
- Python并发编程
- TensorFlow
- Django
- NumPy
- Linux
- Shell
- Java教程
- 设计模式
- Java Swing
- Servlet
- JSP教程
- Struts2
- Maven
- Spring
- Spring MVC
- Spring Boot
- Spring Cloud
- Hibernate
- Mybatis
- MySQL教程
- MySQL函数
- NoSQL
- Redis
- MongoDB
- HBase
- Go语言
- C#
- MATLAB
- JavaScript
- Bootstrap
- HTML
- CSS教程
- PHP
- 汇编语言
- TCP/IP
- vi命令
- Android教程
- 区块链
- Docker
- 大数据
- 云计算